Creating hyperlinks in PowerPoint can significantly enhance your presentations by making them more interactive and engaging. Whether you want to link to a website, another slide, or a different file, the process is simple. In this guide, we’ll walk you through the steps on how to make a hyperlink in PowerPoint, ensuring even beginners can follow along easily.
What Is a Hyperlink?
A hyperlink is a link that, when clicked, takes you to another location, such as a webpage, a different slide in the presentation, an email address, or another file. Hyperlinks are useful for adding interactivity to your slides, allowing you to navigate through different sections smoothly or provide additional resources to your audience.
Why Use Hyperlinks in PowerPoint?
- Interactive Presentations: Hyperlinks make your presentation more dynamic and engaging.
- Easy Navigation: Quickly move between slides or to external content.
- Additional Resources: Provide easy access to supplementary materials.
- Professional Look: Enhances the professionalism and functionality of your presentation.
Types of Hyperlinks in PowerPoint
- Webpage Links: Direct your audience to a specific website.
- Slide Links: Navigate to another slide within your presentation.
- Email Links: Open an email client with a predefined email address.
- File Links: Link to external files like PDFs, Word documents, or other presentations.
Step-by-Step Guide to Creating Hyperlinks in PowerPoint
1. Hyperlink to a Webpage
Step 1: Select the Text or Object
First, highlight the text or select the object (like an image or shape) you want to turn into a hyperlink.
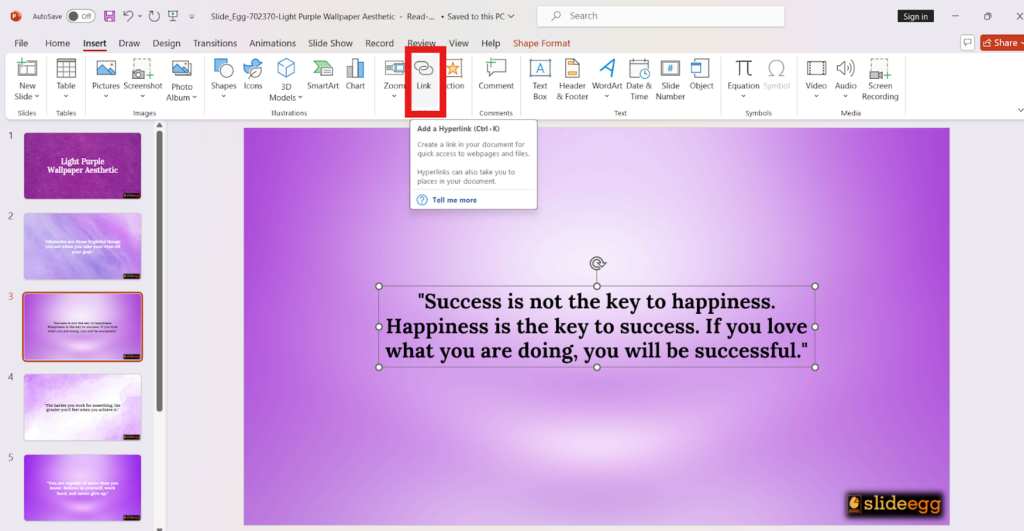
Step 2: Open the Hyperlink Dialog Box
Go to the “Insert” tab on the Ribbon. In the “Links” group, click on “Hyperlink.” Alternatively, you can right-click the selected text or object and choose “Link” or “Hyperlink” from the context menu.
Step 3: Enter the URL
In the “Insert Hyperlink” dialog box, enter the URL of the webpage you want to link to in the “Address” field.
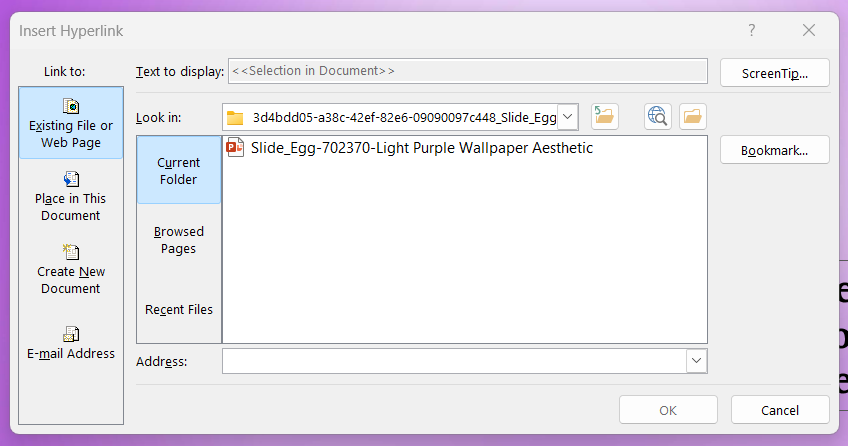
Step 4: Click OK
Click “OK” to create the hyperlink. Your text or object will now link to the specified webpage.
2. Hyperlink to Another Slide
Step 1: Select the Text or Object
Highlight the text or select the object you want to link to another slide.
Step 2: Open the Hyperlink Dialog Box
Go to “Insert” > “Hyperlink” or right-click and select “Link.”
Step 3: Choose “Place in This Document”
In the “Insert Hyperlink” dialog box, choose “Place in This Document”
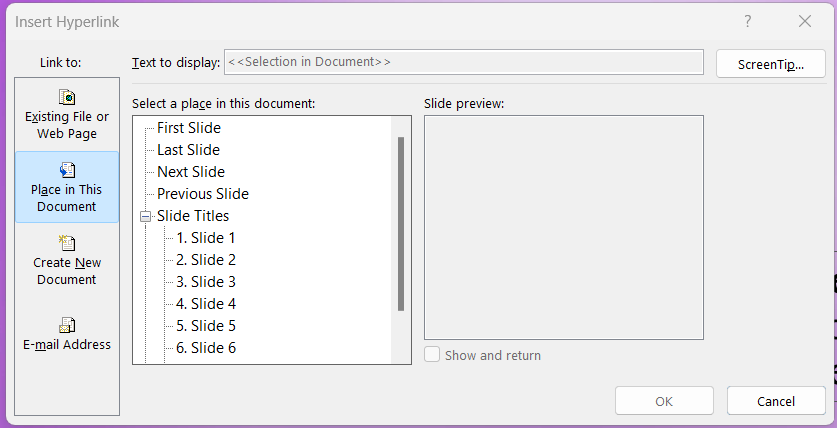
Step 4: Select the Slide
A list of slides will appear. Choose the slide you need to link to and click “OK.”
3. Hyperlink to an Email Address
Step 1: Select the Text or Object
Highlight the text or select the object you want to turn into an email link.
Step 2: Open the Hyperlink Dialog Box
Go to “Insert” > “Hyperlink” or right-click and choose “Link.”
Step 3: Choose “Email Address”
In the “Insert Hyperlink” dialog box, click on “Email Address.”
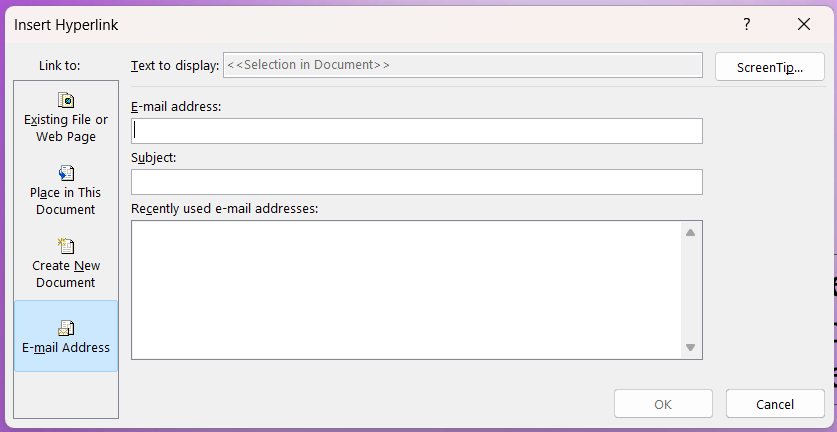
Step 4: Enter the Email Details
Add the email address you like to link to in the “E-mail address” field. You can also add a subject to the email if desired.
Step 5: Click OK
Click “OK” to create the email hyperlink.
4. Hyperlink to Another File
Step 1: Select the Text or Object
Highlight the text or select the object you want to turn into a link to another file.
Step 2: Open the Hyperlink Dialog Box
Go to “Insert” > “Hyperlink” or right-click and choose “Link.”
Step 3: Choose the File
In the “Insert Hyperlink” dialog box, click on “Existing File or Web Page.” Navigate to the file you want to link to, select it, and click “OK.”
Tips for Using Hyperlinks in PowerPoint
- Test All Links: Before presenting, make sure all hyperlinks work correctly.
- Use Clear Text: Ensure the linked text is clear and descriptive so the audience knows what to expect.
- Consistency: Keep the style of hyperlinks consistent throughout your presentation.
- Backup Files: If linking to external files, ensure they are accessible on the presentation device.
Common Issues and Troubleshooting
- Broken Links: Double-check the URL or file path to ensure accuracy.
- Compatibility: Ensure external files are compatible with the device you’ll be presenting on.
- Hyperlink Formatting: If hyperlinks don’t look like links, manually change the text color and underline style.
Conclusion
Hyperlinks are a powerful tool to enhance your PowerPoint presentations, making them more interactive and informative. By following these simple steps, you can create hyperlinks to webpages, other slides, email addresses, and external files with ease. This guide ensures that even beginners can master the art of creating hyperlinks in PowerPoint, adding a professional touch to their presentations. You can also check out our guide on How to Make a Hyperlink in Google Slides to learn the steps to add hyperlinks in Google Slides. Start linking and make your presentations stand out!


