PowerPoint presentations are a visual medium, but the text you include is often the heart of your message. Text boxes are versatile tools that help you organize and highlight your content. Whether you’re adding a captivating headline, a bullet-pointed list, or a quote, understanding how to manipulate text boxes is essential. In this guide, we’ll walk you through the simple steps to add, copy, and delete text boxes like a pro.
Adding a Text Box to Your Slide
Adding a text box in PowerPoint is as easy as pie. Follow these steps:
Step 1: Open your PowerPoint presentation.
Step 2: Navigate to the “Insert” tab. You’ll find this at the top of your PowerPoint window.
Step 3: Click on the “Text Box” button. This will usually be in the “Text” group.
Step 4: Click and drag on your slide. This will create a text box of your desired size.
Step 5: Start typing your text. Your text will appear within the box.

Pro Tip: Want to add a text box quickly? Use the keyboard shortcut Alt+N to go to the Insert tab, then Alt+X to create a text box.
Copying a Text Box: Duplicate Your Content Effortlessly
Need to reuse the same text or formatting? Copying a text box is a time-saver. Here’s how:
Step 1: Click on the text box you want to copy.
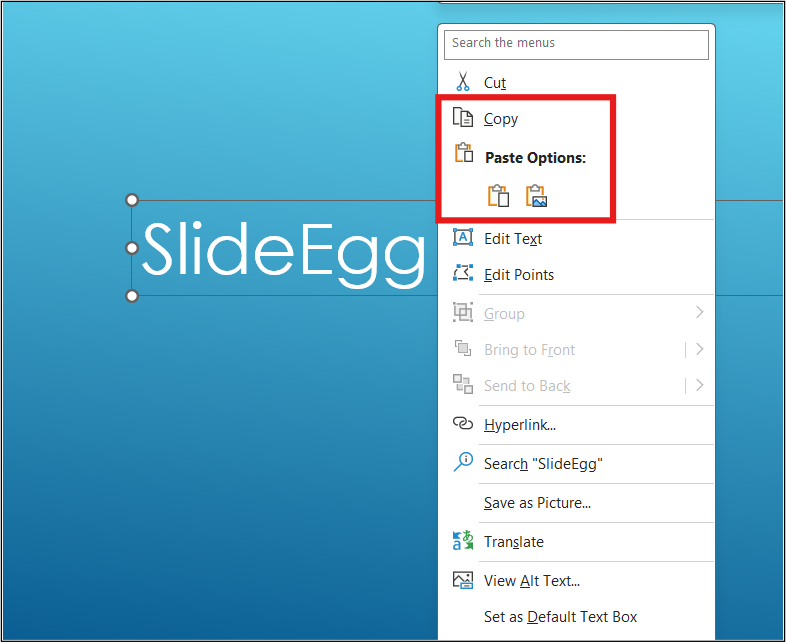
Step 2: Right-click on the text box. This will open a context menu.
Step 3: Select “Copy” from the menu.
Step 4: Click on the slide where you want to paste the copied text box.
Step 5: Right-click and select “Paste.” A duplicate of the text box will appear.
Keyboard shortcut: You can also use Ctrl+C to copy and Ctrl+V to paste a text box.
Deleting a Text Box: Clean Up Your Slides
Removing unwanted text boxes is essential for a clean and professional presentation. Here’s how to do it:
Step 1: Click on the text box you want to delete.
Step 2: Press the “Delete” key on your keyboard. The text box will disappear.
Alternative method: You can also right-click on the text box and select “Cut” or “Delete” from the context menu.
Formatting Your Text Boxes: Add Style and Clarity
Once you’ve added your text boxes, you’ll want to format them to match your presentation’s style. You can modify the font, size, color, alignment, and more. For a detailed guide on text formatting, check out our blog on how to format the text in PowerPoint.
Tips and Tricks for Text Box Mastery
- Use text boxes for emphasis: Highlight key points or callouts with text boxes.
- Create bullet points: Use text boxes to create easy-to-read bullet points.
- Align text boxes: Ensure your text boxes are aligned properly for a polished look.
- Experiment with different fonts and colors: Enhance readability and visual appeal.
Use Premade Textbox PowerPoint Templates

Save time and effort by using professionally designed textbox templates. You can find a wide range of templates online that include pre-formatted text boxes.
By following these tips and mastering the basics of adding, copying, and deleting text boxes, you’ll be well on your way to creating engaging and informative PowerPoint presentations.
Want to learn more presentation hacks? Check out our tips and tricks page for additional insights and inspiration.
Note: While PowerPoint is a powerful tool, consider using Google Slides for collaboration or online presentations. If you’re interested, you can learn how to add, copy, and delete text boxes in Google Slides here: How to Add, Copy, and Delete Text Boxes in Google Slides.
By combining these techniques with effective visuals and a clear structure, you can create presentations that captivate your audience and leave a lasting impression.