Creating a compelling Google Slides presentation is just half the battle; on delivery day, you might need physical handouts for your audience. Whether you’re a student, educator, or professional preparing for a meeting or workshop, effectively printing your Google Slides templates can save time and ensure your materials look professional. This comprehensive guide will walk you through every step of the process, from setting up your slides for printing to choosing the right print settings, ensuring your audience has clear and informative takeaways.
Step-by-Step Guide to Printing Presentations in Google Slides
Step 1: Open Your Google Slides Presentation
First, open the presentation you wish to print. Ensure that your slides are complete and formatted how you want them to appear in print.
Step 2: Access the Print Settings
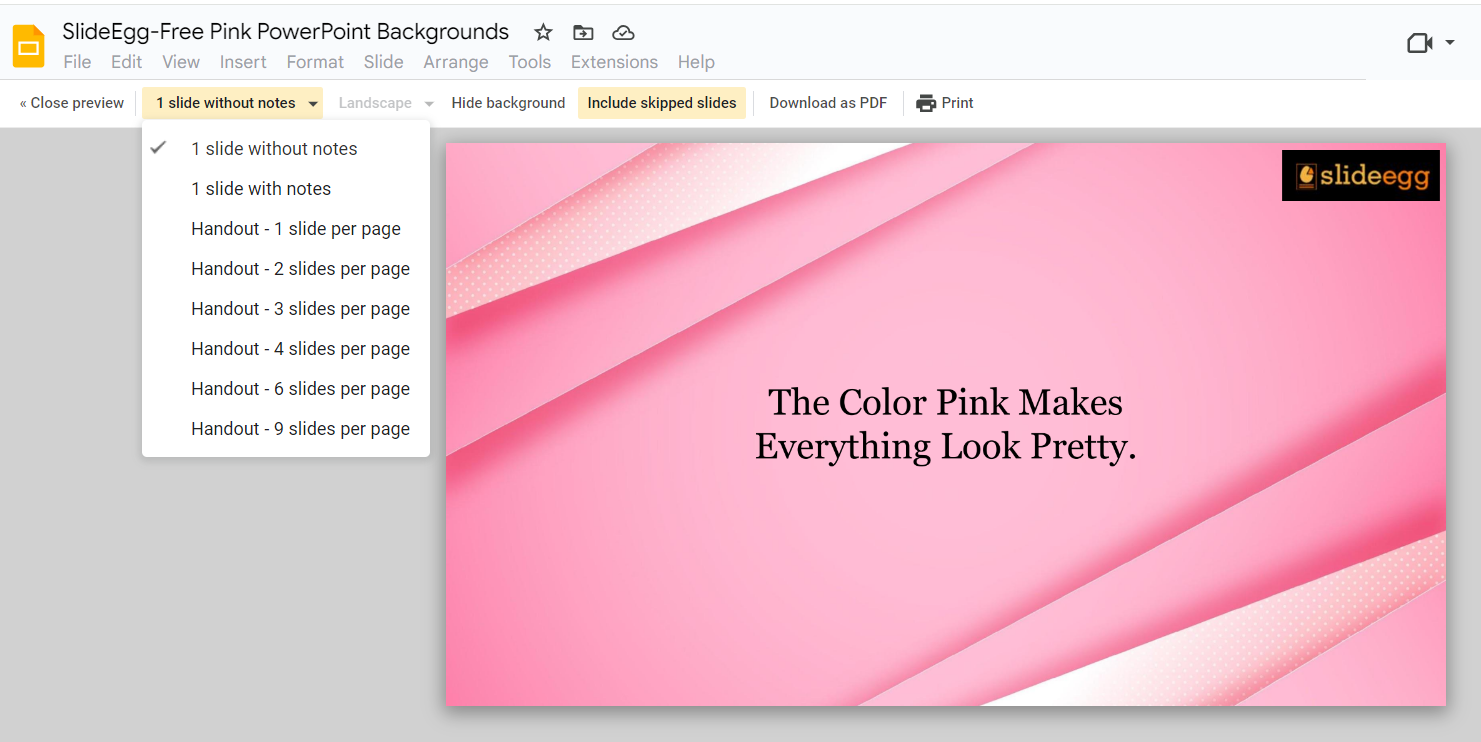
Open the “File” menu located in the upper-left corner of the screen. From the dropdown menu, select “Print preview.” This will open a new view where you can see how your slides will look when printed.
Step 3: Choose Your Print Layout
In the print preview screen, you have several layout options. You can print one slide per page, multiple slides per page, or even include a notes section. Select the layout that fits your requirements best. For handouts, printing multiple slides per page is often the most efficient option.
- One slide per page: Best for detailed presentations where each slide contains a lot of information.
- Multiple slides per page: Ideal for handouts and summaries, allowing you to fit more content on fewer pages.
- Notes pages: If you need to present additional information alongside your slides, printing with notes can be useful.
Step 4: Adjust Other Print Settings
In the preview screen, you can adjust other settings like page orientation (portrait or landscape), paper size, and whether to include the background. Consider these settings carefully to ensure your presentation looks its best when printed.
Step 5: Print Your Presentation
Click on the “Print” button, once you have configured all your settings. A standard print dialog box will appear, allowing you to choose your printer and finalize your print job. Double-check your settings here to ensure everything is correct.
Tips for Better Printing
- Check Margins and Layout: Ensure your slides fit well within the margins to avoid content getting cut off.
- Use High-Quality Images: Low-resolution images can look pixelated when printed. So, always ensure that the images are of high quality.
- Preview Before Printing: Always use the print preview feature to check how your slides will look in print.
Going Green Tip: Consider double-sided printing to save paper and reduce your environmental footprint!
Final Touches: Acing the Handout
Here are some final touches to ensure your handouts are professional and user-friendly:
- High-Quality Paper: Choose a paper type that complements your presentation’s content and visuals. Glossy paper might be suitable for presentations with a lot of images, while matte paper works well for text-heavy content.
- Clear Headers and Footers: Add headers or footers with the presentation title, date, and your contact information for easy reference.
- Punch Holes (Optional): If your handouts are meant to be placed in a binder, consider adding pre-punched holes for easy organization.
Bonus Tips:
To make your presentations more visually appealing, consider using premade Google Slides themes available online. These themes can save you time and ensure your slides have a professional look. Many websites offer free themes that you can easily customize to fit your presentation’s content.
If you often find yourself needing to print presentations in the MS PowerPoint platform, you might also be interested in our detailed guide on how to print presentations in PowerPoint.
Conclusion
By following these steps and incorporating some creativity, you can ensure your Google Slides presentations translate flawlessly into impactful printed materials. If you found this guide helpful, be sure to check out our other resources for more tips and tricks on creating and printing presentations. So, go forth and print with confidence!