Making clear, uncluttered slides is a part of any good presentation-from a school project to a business pitch. A small formatting tool called hanging indent can help you achieve this.
But how do you do this in Google Slides? Not quite as intuitively obvious as in Google Docs, but once you know the trick, super easy! Let’s dive in!
What is a Hanging Indent?
Before getting to the how-to’s, let us briefly discuss what a hanging indent is: A hanging indent is when the first line of a paragraph is aligned with the left margin but is indented on subsequent lines. Such style is highly useful for reference listings or for arranging text for easier reading.
Now, here is your question: How can this be done in Google Slides?
How to Add a Hanging Indent in Google Slides
Google Slides doesn’t have the button for hanging indent like Google Docs does, but don’t worry you’re not out of luck. Here’s an easy trick to get the look you want.
- Open your Google Slides presentation: First, open your Google Slides presentation to the slide you want to add the hanging indent to.
- Add a text box: If you haven’t used it yet, click the button “Insert” > “Text box,” then draw a text box on your slide. Now type your text.
- Highlight the text: Select the text in which you would like to have the hanging indent.
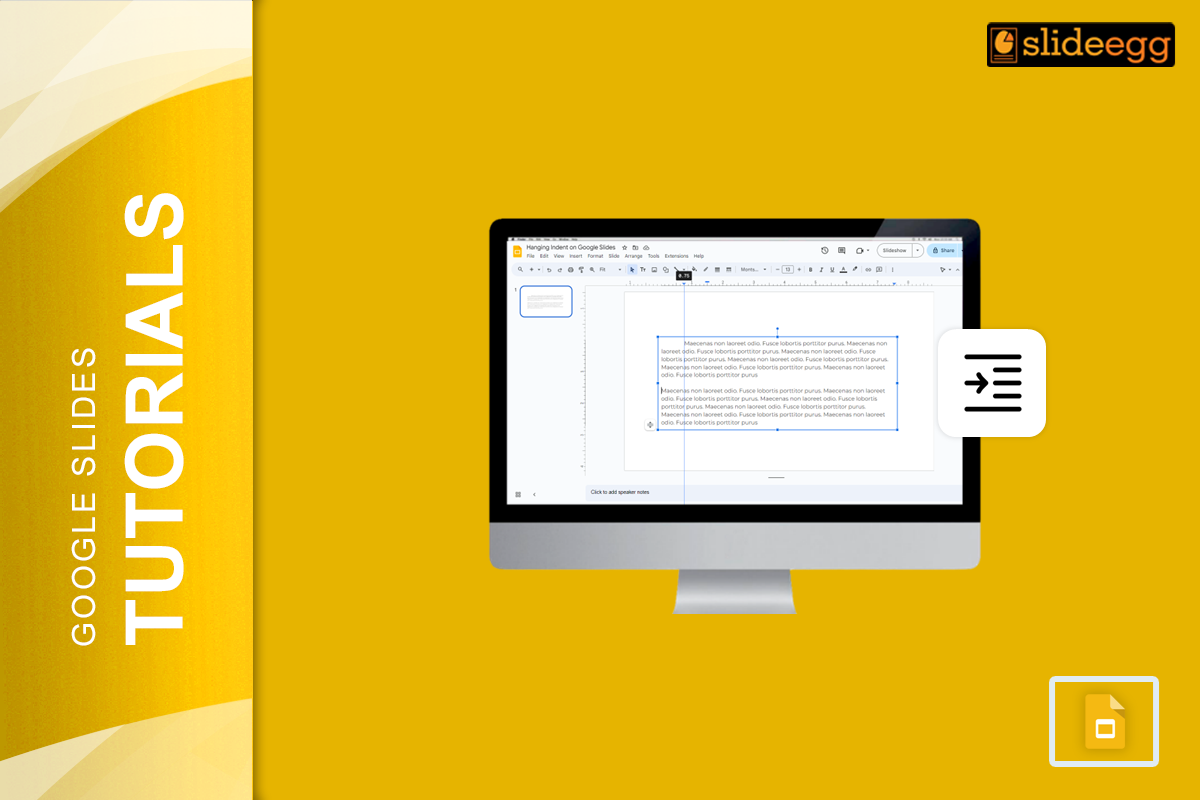
- Open the ruler: To make sure your ruler is visible, go up into your menu bar and click on “View” then “Show ruler.” Your ruler will now appear on top of your slide.
- Move the indent markers:
- There are two blue markers on your ruler. The top triangle will move your first-line indent, and the bottom rectangle will shift your left indent for all of your other lines.
- To create the hanging indent, drag the bottom marker (rectangle) down a little to the right, maybe a half-inch. Then drag the top marker (triangle) back to the left to where it aligns with the left margin.
- Spelling and grammar check, line spacing: Make any needed adjustments to the line spacing so that your text looks the way you want.
And now, you can see a hanging indent in Google Slides.
Why Use a Hanging Indent?
You might ask, why do you want to use a hanging indent in a presentation? Here are a few reasons:
- Improved Readability: Scanning down the page is much more achievable if you have a hanging indent when you have lots of words or lots of items to list.
- Professional Appearance: Such little considerations show that you are taking the time to format your slides appropriately, which gives the presentation a more professional appeal.
- More Elegant Citations: When using research in your presentation, a hanging indent would be an excellent method for presenting your list of references neatly.
Bonus Tips: Google Slides is great for its minimalist, clean design, but this can be even more exciting with some free Google Slides themes found anywhere on the internet. Hundreds of beautifully, professionally designed templates give your presentations an edge without costing you a dime.
Make Your Presentations Pop Even More
By this point, you’ve learned how to create a hanging indent on Google Slides. Now that you also know why not push it a little bit? There’s so much in very small ways with tips and tricks that have been mastered, mastering your slide transitions, playing around with creative fonts, to take it to the next level.
Conclusion
It is a bit fiddly to set up a hanging indent on your text in Google Slides, but there are tricks that will do the job and it can’t really be done by hand, but is very easy to track when you work out the simple trick. Beyond those basics, check out some of these free Google Slides themes for an added boost to your presentation.
All these tiny things, from well-arranged slides to placed indents, can make much in the presentation. When applied above tips, you will be able to make neat, clean well-organized slides that really make an impression on your listeners. Good luck with your next presentation!