
Have you ever delivered a presentation where your audience seemed to glaze over at walls of text? It’s a common struggle. Information overload can be overwhelming, and key takeaways can easily get lost in the shuffle. Studies show that audiences retain information better when it’s presented visually. Highlighting text in Google Slides is a simple yet powerful technique to grab attention. This blog post will guide you through the easy-to-follow steps of highlighting text in Google Slides, along with some handy tips to make your presentations shine.
Understanding the Importance of Highlighting Text
Highlighting text in your presentations is not just about making your slides look good; it’s about communication. Highlighted text can:
- Emphasize key points.
- Draw attention to important data.
- Improve audience comprehension.
- Make your slides more visually appealing.
Highlighting Text in Google Slides: A Step-by-Step Guide
Step 1: Open Your Presentation
- Fire up Google Slides and open the presentation where you want to add highlights.
Step 2: Select the Text
- Navigate to the slide containing the text you want to emphasize. Click on the text box to make changes. Then, use your mouse to drag and select the specific portion of text you want to highlight.
Step 3: Access the Text Toolbar
- Once you’ve selected the text, a toolbar should appear at the top of the screen. This toolbar provides various formatting options for your text.
Step 4: Choose the Highlighting Color
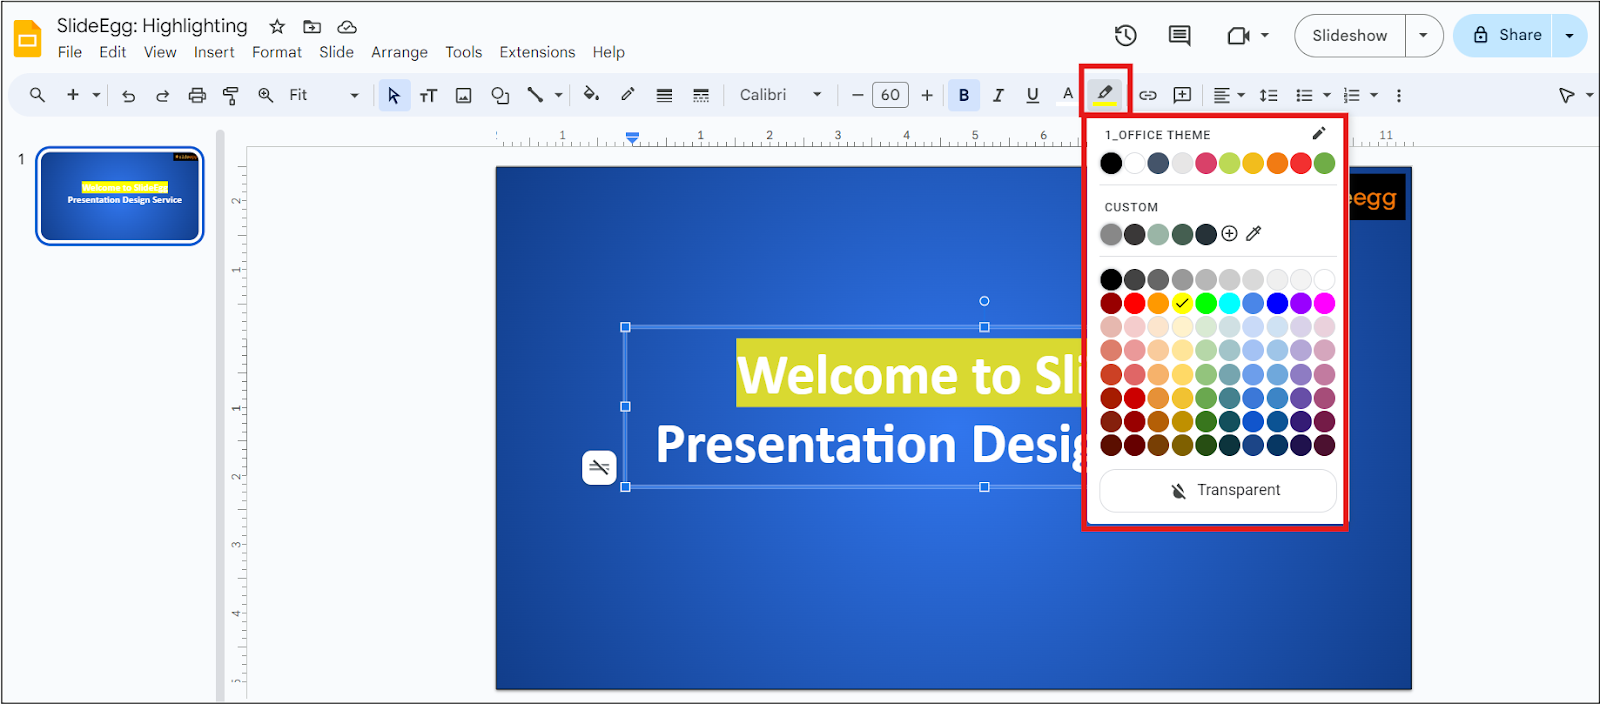
- Look for the “text highlight color” option. It’s usually represented by a small highlighter icon (sometimes a marker or pencil symbol) next to the text color option. Clicking this icon will display a dropdown menu with various highlighting color options.
Step 5: Pick Your Perfect Shade
- The dropdown menu offers a range of pre-selected highlight colors. Choose a color that complements your overall presentation theme and stands out clearly against the background. If you don’t find a perfect match, don’t worry! Many versions of Google Slides allow for “custom” highlighting.
Step 6: Customizing the Highlight (Optional)
- For a more precise color selection, click on “Custom” in the dropdown menu. This will open a pop-up window where you can either enter a specific color code (HEX code) or use a color picker to choose your ideal highlighting shade.
Step 7: Highlighted Text
- Click “Apply” to finalize your highlight selection. Your chosen color will now be applied to the selected text, making it stand out for your audience.
Tips for Effective Highlighting
- Less is More: Don’t overdo it with highlighting. Target key points, phrases, or short sentences that you want your audience to remember. Excessive highlighting can be distracting and defeat the purpose.
- Choose Wisely: Opt for contrasting colors that are easy on the eyes. Avoid using overly bright or neon shades that might overwhelm your audience.
- Maintain Consistency: Stick to a consistent highlighting color throughout your presentation for a more polished look. This creates a visual cue for your audience to recognize important information.
- Combine with Other Techniques: Highlighting text is just one tool in your presentation toolbox. Consider using bolding, italics, or different font sizes to further emphasize key points and create a visual hierarchy within your slides.
Beyond Highlighting: Mastering Text Formatting
For a deeper dive into text formatting options in Google Slides, check out our comprehensive guide on How to Format Text in Google Slides. This guide explores everything from changing fonts and sizes to adding special effects and creating bulleted lists – all the tools you need to make your text clear, concise, and visually appealing.
Presentation Hacks
Want to unlock even more presentation magic? Head over to our tips & tricks page for a pack of presentation hacks. Discover creative ways to engage your audience, learn how to design impactful visuals, and master the art of storytelling through presentations.
Let’s Wind Up
Highlighting text in Google Slides is an essential skill for creating engaging presentations. By ensuring your text is highlighted properly, you can guide your audience’s attention to the most important parts of your slides, making your overall message clearer and more impactful. By following these simple steps and incorporating highlighting effectively, you can transform your Google Slides presentations from informative to truly impactful. Now go forth and create presentations that shine!