| Quick Tips to Group Slides in Google Slides Grouping slides helps you stay organized, especially when working on big presentations. Here are some quick steps: ✅ Use Slide Sections – Google Slides doesn’t have a direct “group slides” feature, but you can organize slides into sections. ✅ Duplicate and Move – Copy slides and move them into a structured order for better management. ✅ Use Colors & Titles – Label slides with different colors or headings to make them easier to find. ✅ Link Slides – Create clickable links between slides to navigate faster. Now, let’s dive into the details! |
Introduction: Organizing Slides in Google Slides Made Easy
“Good organization is half the job done!”
Finding the right slide in a large presentation can be frustrating. Scrolling through dozens of slides wastes time and makes editing harder.
Well, Google Slides doesn’t have a built-in “group slides” feature, but that doesn’t mean you can’t organize your slides smartly! With a few simple tricks, you can create sections, move slides in bulk, add internal links, and make your presentation super easy to manage.
Let’s break it down into easy-to-follow steps so you can keep your slides neat and structured.
Step 1: Use Slide Sections for Better Organization
Even though Google Slides doesn’t have an official “slide grouping” option, you can create sections using simple workarounds.
How to Create Slide Sections?
- Add a Title Slide – Insert a blank slide before each section and name it (e.g., “Introduction,” “Main Points,” “Conclusion”).
- Use a Different Background Color – Change the background of section slides to make them stand out.
- Insert Divider Slides – You can add simple “Section Break” slides with a big title to separate different parts of your presentation.
This trick helps you visually group your slides so you can easily find what you need!
Step 2: Move Multiple Slides at Once
Want to rearrange multiple slides together? It’s super easy!
How to Move Multiple Slides?
- Hold down the Shift key and click on each slide you want to move.
- Drag them to the new position in the slide sorter on the left.
- Done! Your slides are now in a new order.
This trick is perfect when you need to restructure your presentation without losing track of your content.
Step 3: Use Links to Connect Slides
Another smart way to “group” slides in Google Slides is by using hyperlinks. This makes navigation smoother, especially in big presentations.
How to Link Slides Together?
- Select the text or image you want to link.
- Click on Insert → Link (or press Ctrl + K on Windows / Cmd + K on Mac).
- Select the slide you want to link to.
- Click Apply – and you’re done!
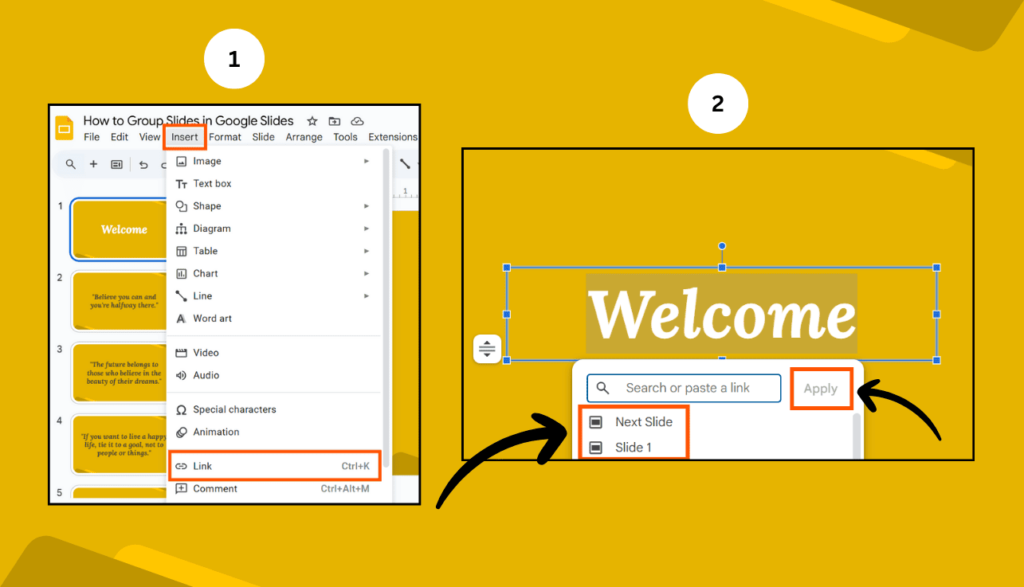
Now, when you click that link, you’ll jump straight to the connected slide. This is perfect for interactive presentations!
Step 4: Duplicate Slides to Keep Related Content Together
If you need to group similar slides, another trick is duplicating them and keeping them together.
How to Duplicate Multiple Slides?
- Select the slides you want to copy.
- Right-click and choose Duplicate Slide (or press Ctrl + D on Windows / Cmd + D on Mac).
- Move them to your desired position in the slide sorter.
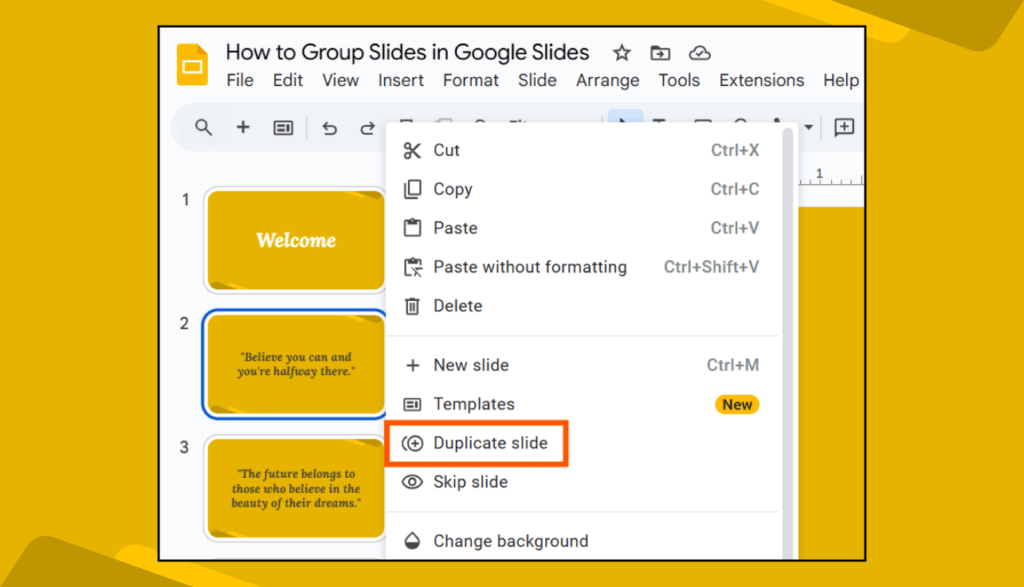
This method is great for creating backup slides or different versions of the same slide without messing up your original content.
Step 5: Label and Color-Code Your Slides
A visual organization method is to label and color-code your slides for better clarity.
How to Color-Code Slides?
- Select a slide.
- Click on Background and choose a different color.
- Use different colors for different sections (e.g., Blue for the Introduction, Green for the Main Points, and Red for the Conclusion).
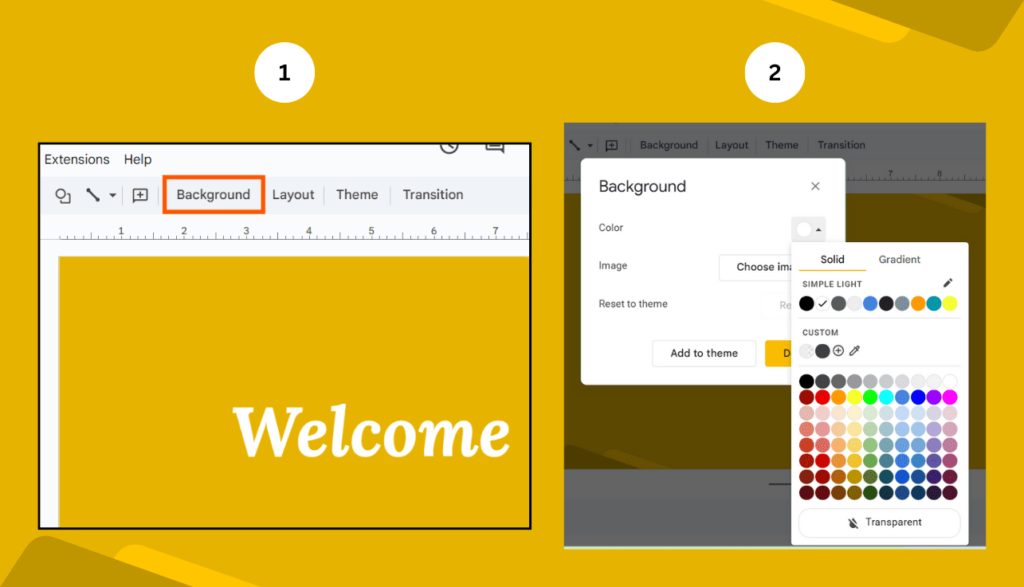
This helps you quickly spot different sections in your presentation!
FAQs About Grouping Slides in Google Slides
1. Can I group slides together in Google Slides like I do with objects?
No, Google Slides doesn’t have a built-in feature to group slides. But you can use section titles, move slides in bulk, and add hyperlinks to keep things organized.
2. How do I move multiple slides at once?
Simply hold the Shift key, select multiple slides, and drag them to the new location.
3. Can I create folders inside Google Slides?
No, but you can organize your slides into sections using divider slides and labels.
4. How do I duplicate multiple slides?
Select the slides, right-click → Duplicate, or press Ctrl + D / Cmd + D to create copies.
5. How do I make my slides easier to navigate?
Use hyperlinks to connect slides, add section titles, and color-code your slides for better organization.
Final Thoughts
Even though Google Slides doesn’t have an official “group slides” feature, there are plenty of smart ways to keep your slides organized. Whether it’s using section titles, moving multiple slides, or adding clickable links, these tricks make managing presentations much easier.
Now that you know how to keep your slides structured, go ahead and create clean, well-organized presentations that are easy to navigate!