| Quick Outline to Animate Text in Google Slides Here’s a quick overview of how to animate text in Google Slides: ✔ Select the text box you want to animate. ✔ Click “Insert” → “Animation” from the menu. ✔ Choose an animation effect (fade in, fly in, zoom, etc.). ✔ Set the timing (on click, with previous, after previous). ✔ Click “Play” to preview your animation. ✔ Adjust settings for a smooth, engaging effect. Alright, now let’s break it down step by step! |
Are You Still Using Static Slides? Let’s Fix That!
How many times have you zoned out during a presentation? You’re staring at the screen, reading a wall of text, and before you know it… your mind is somewhere else.
Now flip the scenario. Imagine you’re the one presenting. You’ve got important points to make, but your slides? They look… dull. No movement, no emphasis—just text sitting there like it’s stuck in the past.
Static slides don’t grab attention. But the animated text does. Adding simple animations can make your slides more engaging, more professional, and way more fun to watch. And it’s ridiculously easy to do in Google Slides.
So, whether you’re presenting in class, at work, or just making a fun slideshow, let’s bring your text to life—step by step!
Step 1: Open Google Slides and Select Your Text
First, open your Google Slides presentation. Click on the text box that you want to animate. You can animate a title, a bullet point, or even a single word—it’s totally up to you!
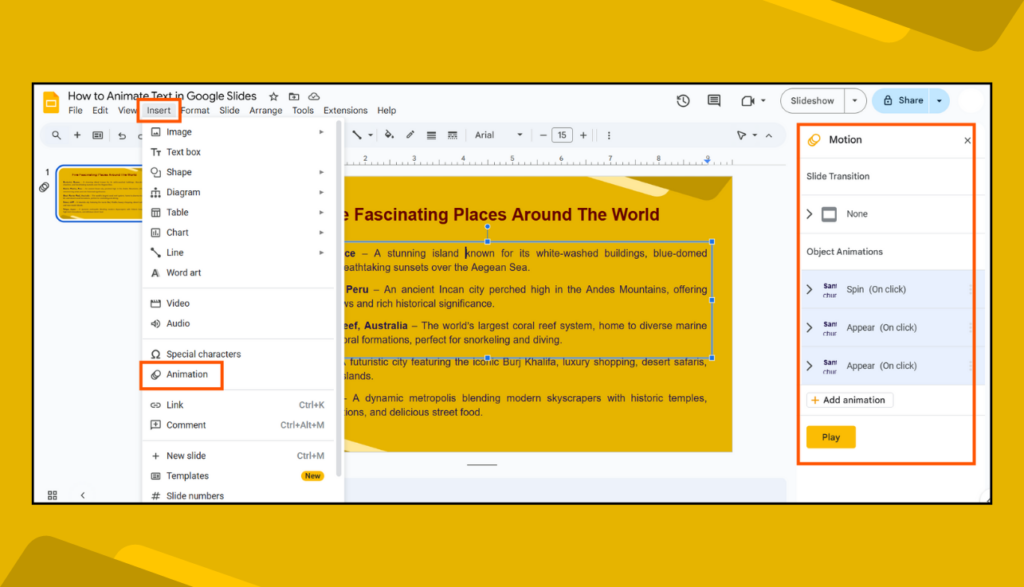
Step 2: Open the Animation Panel
✔ Go to the top menu and click “Insert” → “Animation”.
✔ This will open the Motion panel on the right side of your screen.
✔ If you don’t see the “Animation” option, try right-clicking the text box and selecting “Animate” from the menu.
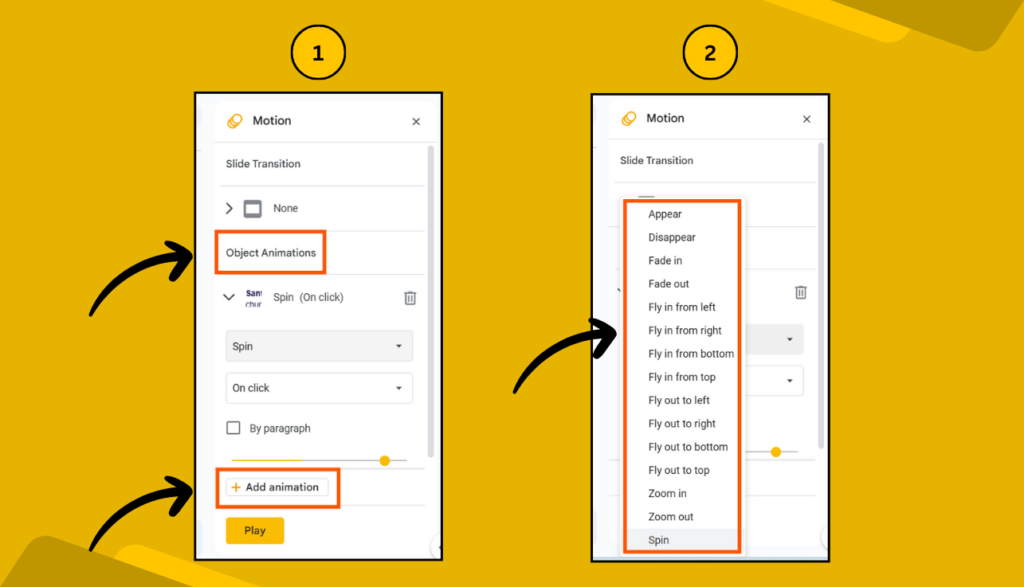
Step 3: Choose an Animation Effect
Now comes the fun part! Under “Object Animations”, click “Add Animation” and pick an effect that fits your style:
✅ Fade in – Smooth and subtle, great for a clean look.
✅ Fly in from left/right – Grabs attention, perfect for key points.
✅ Zoom in – Dramatic effect, great for titles.
✅ Appear – Simple and instant, no transition.
✅ Spin – Fun and playful (use sparingly!).
Step 4: Set the Animation Timing & Trigger
Now, decide when and how the animation plays:
🟢 On Click – The text appears when you click.
🔵 With Previous – The animation happens with another action.
🟠 After Previous – It plays automatically after the last animation.
You can also adjust the speed using the slider.
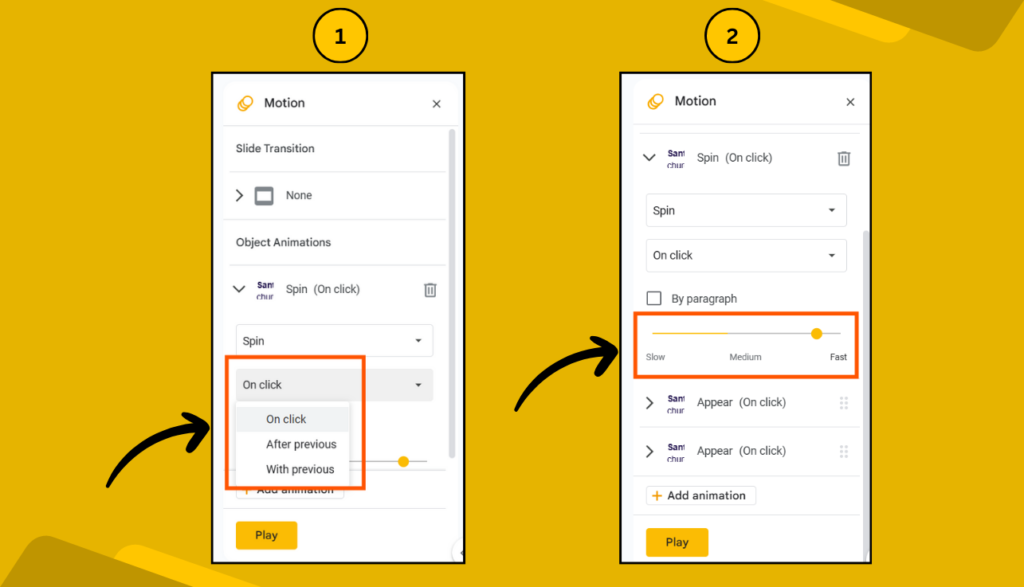
💡 Pro Tip: Slow animations feel elegant, while fast ones create energy—pick wisely based on your presentation’s vibe.
Step 5: Preview & Fine-Tune the Animation
Click the “Play” button in the Motion panel to see your animation in action.
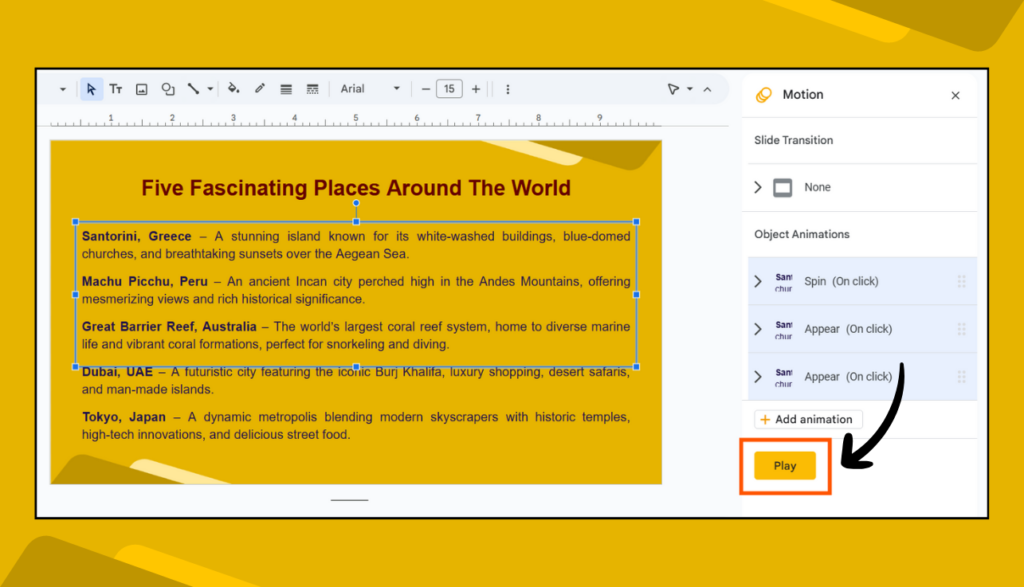
💡 Pro Tip: If your slide has multiple text boxes, try staggering the animations so each point appears one after another—it keeps the audience engaged without overwhelming them.
Bonus: Add Multiple Animations to One Text Box
Want to level up? You can layer multiple animations on the same text!
🔹 Click on the text box again.
🔹 Click “Add Animation” (don’t replace the first one).
🔹 Choose a second effect (e.g., fade in + zoom).
🔹 Adjust the order and timing.
This is a great way to create eye-catching effects while keeping things professional.
Best Practices for Animating Text in Google Slides
✔ Less is more – Too many effects can be distracting.
✔ Use animations to emphasize points, not just for fun.
✔ Keep a consistent style – Stick to 2-3 animation types.
✔ Don’t overuse spin effects – It can look unprofessional.
✔ Test everything before presenting.
FAQs About Animating Text in Google Slides
1. Can I animate text in Google Slides on mobile?
No, animations are only available on the desktop version of Google Slides.
2. Can I make text appear letter by letter?
Google Slides doesn’t have a built-in “letter-by-letter” effect, but you can manually animate each letter using separate text boxes.
3. How do I remove an animation?
Go to the Motion panel, click on the animation, and hit “Delete”.
4. Can I animate bullet points one by one?
Yes! Select your bullet points, add an animation, and choose “By paragraph” to make each point appear separately.
5. Will animations work during an online presentation?
Yes! Animations will work the same way whether you’re presenting in person or sharing your screen on Zoom or Google Meet.
Final Thoughts
Google Slides animations aren’t just for making things look cool (though that’s a nice bonus). When used right, they help guide your audience, emphasize key points, and keep people engaged—which is exactly what you want in a presentation.
So, go ahead—experiment, tweak the settings, and make your slides pop. Your audience will thank you!